
Tired of photoshopping your images to extract their foreground ? This post will explain what the GrabCut algorithm is and how to use it for automatic image segmentation with a hands-on OpenCV tutorial!
On my latest project, the first step of the algorithm we designed was seemingly simple: extract the main contour of an object on a white background. In this post, we’ll see how to solve this problem using GrabCut, a smart segmentation algorithm.
Go to the last section for a tutorial with open source code to try it out!
Why we used GrabCut for image segmentation
For the purpose of this post, let’s imagine that our object of interest is a spoon. We want to know everything about this spoon, from its length to the shape of each part. In order to do so, the first step is to extract its main contour.
To do so, our first idea was to use OpenCV “findContours”. As its name tells us, this method extracts contours from a binarized image. As you can see below, it did not go as planned!
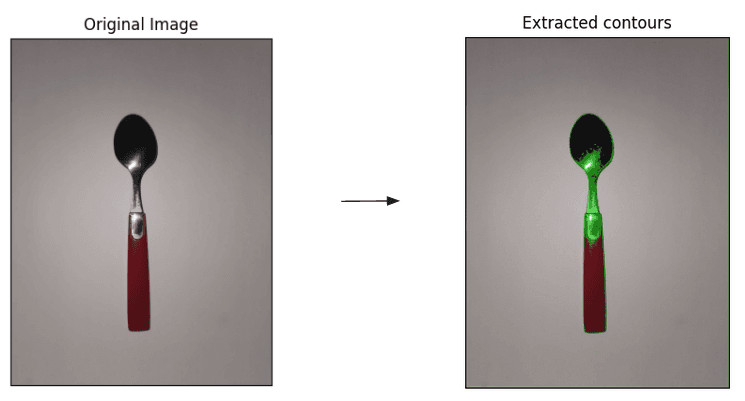
Contours extracted with “findContours” are as good as the initial image binarization. In this example, we did not manage to obtain such a binarization. Indeed, pixels from the spoon were converted to 0s, notably around the flash zone. As a result, the main extracted contour is discontinuous. Moreover, the numerous subcontours present on the final image are noise that prevents us from retrieving the main shape of the spoon.
At this point, we took a step back. What are the initial problem characteristics?
- one main object of interest on a united background
- the object of interest is roughly always at the same position on the photo
- not a lot of data, so training a machine learning algorithm is not really an option
Stated this way, our initial contours extraction problem can be solved with image segmentation. More specifically, foreground extraction is sufficient in this case. This is exactly what the GrabCut algorithm does.
A little bit of theory: how does GrabCut work for Image Segmentation ?
In this section, we’ll dive into GrabCut theory. If you want to code right away, go to the next section!
Initially, GrabCut is an interactive foreground extraction algorithm which purpose is to minimize user interaction. Carsten Rother, Vladimir Kolmogorov and Andrew Blake designed it in 2004.
Problem formulation: what does image segmentation mean?
First, segmenting an image means attributing a label to each of its pixel. In the case of GrabCut and other foreground extraction algorithms, each pixel is either labeled as being in the foreground or the background of the image.
.png?width=800&height=304&name=image_segmentation_efcc3c2dde1a10538c5a9c3d049cd5f4_800%20(1).png)
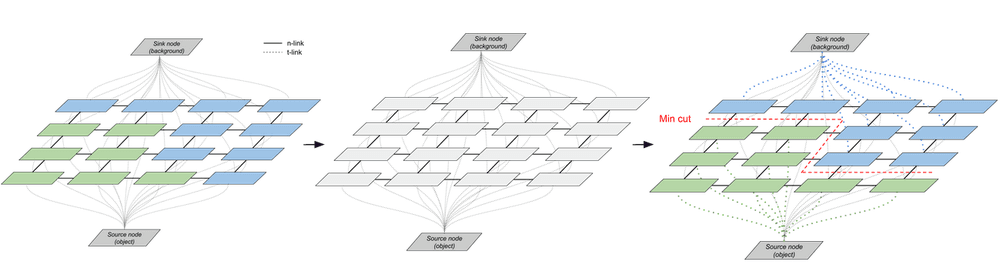
Graph modeling
To obtain the segmentation, GrabCut takes advantage of the graph-like structure of an image. Each pixel has several links:
- one “n-link” to each of its 4 direct neighbors
- two “t-link” to the source and sink nodes of the graph, representing respectively the image foreground and background. If you feel lost don’t worry, I’ll go into the details in the next paragraph.
After graph construction, the image segmentation task consists of finding the cut of minimal cost that separates foreground and background. Let’s see how the graph is built!
.png?width=800&height=343&name=graph_modeling_cd1b0166d364235df258a0e3e2f6fb7f_800%20(1).png)
GrabCut graph definition
To build the graph, you need to perform these two steps:
- Define the weights attributed to each type of link
- Define the associated cost function. Image segmentation is then equivalent to minimizing this cost function.
To obtain a relevant segmentation, weights attributed to the two types of links need to reflect what a good segmentation is.
- “n-links” represent local information about a pixel and its direct surroundings.

The intuition behind it is that you want similar pixels to be grouped together: it should be more expensive to cut a link between two pixels close in color than between two different pixels
- “t-links” represent global information about color distribution in the foreground and the background of the image. A t-link weight shows how well a pixel fits the background/foreground model. Gaussian Mixture Models (GMMs) model them in GrabCut.

I won’t go into GMMs details but if you want an introduction, this great article by brilliant.org is a good place to start.
Once the weights are defined, the cost function or energy function E is their sum over the graph:

Graph theory to solve image segmentation
Once the cost function is defined, solving the image segmentation problem is equivalent to solving a MinCut problem. This is a classic graph theory problem that a MinCut algorithm can solve.
Finally, GrabCut is an iterative algorithm. The initial output segmentation is used to re-estimate graph weights and then refine the image segmentation again, resulting in the GrabCut iterative loop.
Initialize the labels
To estimate graph weights for the first time, GrabCut needs some type of labels initialization.
In the original GrabCut version, the algorithm is interactive. The user provides a partial segmentation initialization by drawing a rectangle containing the object of interest. If needed, he can also apply touch-ups at the end of the segmentation to improve it.
.png?width=800&height=399&name=initial_user_input_d82d7370291b3ee549676c65f45fa74a_800%20(1).png)
In our use-case, we want the algorithm to be fully automatic. To do so, we take advantage of previous knowledge about the images we want to segment. For instance, we know roughly where the object is on the image. This is how we drew the input rectangle.
We’ll see in the code section how to use other input knowledge to improve the segmentation.
Refine the segmentation
GrabCut goes a bit further than the hard segmentation between foreground and background. Once the iterative loop finishes, labels around the segmentation border are refined and classified into four groups: sure background, probable background, probable foreground, and sure foreground.
.png?width=800&height=242&name=segmentationrefinement_255885a151e051a428dd542b2e7d181b_800%20(1).png)
Then, GrabCut is finished and you’re good to go with the image segmentation!
To sum it up: GrabCut in a nutshell
.png?width=825&height=361&name=original_algorithm_3b3e257e6cd82d95863c6ef397dbd7be_1000%20(1).png)
.png?width=825&height=210&name=automatic_version_5c5a28569680d5dacb87b16617bb0948_1000%20(1).png)
If you want to know more about the algorithm, you can read the original paper for free!
Let’s code: hands-on OpenCV GrabCut Image Segmentation tutorial!
Lucky for us, OpenCV offers an out-of-the-box implementation of GrabCut. Let’s see how we can use it to solve the original image segmentation problem!
For more details, the whole notebook is available on Github.
GrabCut initialized with a bounding box
First, let’s start with an input similar to the user input provided in the original GrabCut version: a bounding rectangle containing the object of interest.
Run the following gist on the image of your choice to see the result:
.png?width=800&height=414&name=grabcut_with_mask_7d4abc3fd994f41707684abecf0e73a2_800%20(1).png)
Well, that is not exactly the expected result! Here, GrabCut did not have enough initial information to perform well and failed to retrieve an accurate mask for the spoon.
GrabCut with a combined initialization
As mentioned earlier, it is possible to provide GrabCut with additional information about the object of interest. This way, we help the initial modeling of the foreground and the background of the image. To do it technically, change the OpenCV mode when calling GrabCut.
One way to provide more information is to start by binarizing the original image and labeling as foreground all output black pixels, that we know are part of the object of interest.

Generally speaking, the more information you can embed in the initial mask, the better to help GrabCut segment your image. This can be done with a multitude of techniques, ranging from image binarization to previous knowledge about image color distribution for instance. You can check out this post about edge detection in Opencv for inspiration!
To conclude, if you face a situation with few data and not much touch time to segment an image, GrabCut is a great candidate! The table below sums up its main strong points and disadvantages:

If these disadvantages are unacceptable in your use-case, other image segmentation alternatives exist, like deep learning approaches such as Mask-RCNN for instance.
I hope this post was useful and I’d love to have your feedback!
You can also checkout OpenCV official GrabCut tutorial for more examples of applying GrabCut to a real-world image.
Are you looking for Image Recognition Experts? Don't hesitate to contact us !